Salesin has long held a great working relationship with Intuit and Quickbooks accounting systems – and much like most of our other integration packages we totally understand that sometimes getting the system set up and running how you want it can get a bit confusing!
That’s why we’ll be going over the basic how-to for our Quickbooks integration in this article and cover everything from the intial set-up to integration settings and more!
Quickbooks Online
This week we’ll start with the easy one! Quickbooks Online! Our integration for Quickbooks Online is about as straightforward as it comes. When you first sign up for your Salesin account you will be prompted to select what level of Salesin features you’d like. All of our integration levels come with the complete Salesin package – when you select this level you will be prompted to choose which accounting system you would like to integrate with. Simply select Quickbooks Online and enter your details as associated with your Quickbooks account and Salesin.
You’ll notice in your Salesin desktop there will be an integration tab named ‘Quickbooks Online’. You’ll then need to set your preferences according to what suits your work flows.
Settings
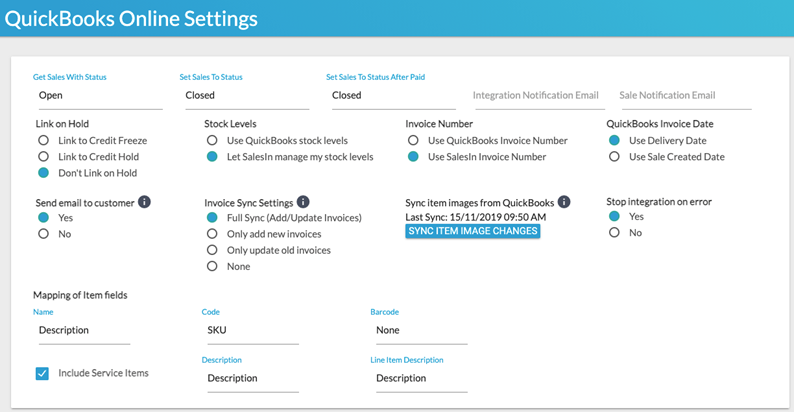
This page contains the settings used to control the SalesIn integration with QuickBooks Online.
- Get Sales With Status – The integration looks at sales in SalesIn that are of a particular Status. This setting defaults to Open, but you can change it to suit your business’ workflow.
- Set Sales To Status – The integration also sets sales to a certain Status once that are imported. This setting defaults to Closed, but you can change it to suit your business’ workflow. It is important to note that once sales are imported into QuickBooks Online, they cannot be re-imported and any edits made in SalesIn do not come through either.
- Set Sales To Status After Paid – One the integration detects that a sale is fully paid, it can set it to be a particular status in SalesIn. This is useful if you only want to close off sales once they are fully paid.
- Notification Email – Enter an email address here and you will notified of any errors the integration encounters while moving data between QuickBooks Online and SalesIn.
- Link On Hold – Specifies how the integration should treat customers that are on Credit Hold in QuickBooks, whether they should be on Credit Hold in SalesIn or Credit Freeze, or not linked at all. Credit hold – sales will still be able to be created but with a warning. Credit Freeze orders won’t be able to be created for this customer.
- Stock Levels – Use QuickBooks Stock Levels means SalesIn items will always have their stock level overwritten by the current stock level in QuickBooks Online. If you want to control stock levels in SalesIn and ignore QuickBooks stock levels completely, choose Let SalesIn Manage My Stock Levels. If stock levels are managed in SalesIn, this will not push across to QuickBooks Online.
- Invoice Number – Specifies whether you want the SalesIn Sale ID to be the invoice number in QuickBooks Online, or whether you want QuickBooks Online to automatically assign its next available invoice number to new sales. If you have previous sales in QuickBooks Online, it is better to let QuickBooks Online create the invoice number, this way there are no duplicates.
- QuickBooks Invoice Date – Specifies the value you want to appear in the Invoice Date field in QuickBooks Online.
- Invoice Sync Settings – Invoice sync settings is related to the invoices that are created or existing in QuickBooks Online. If you have this set to full sync, if an order is created or edited in QuickBooks Online, it will be updated and added in SalesIn. If set to ‘Only add new’, this will only add the new invoices in SalesIn that have been created in QuickBooks Online. If only set to Update, it will not add any new ones created in QuickBooks Online but only update old invoices. If set to ‘None’, then the only invoices that are in SalesIn will be the invoices that have been created in SalesIn.
- Sync Item Images – If you are managing the item images in QuickBooks Online, if you have uploaded more images than are in SalesIn, you can select this button to sync the new images across to SalesIn.
- Stop Integration on Error – If you get an error, you can choose to stop the integration, to make sure you can fix the error before the integration goes across again. Or you can keep the integration going in case any other orders can go across.
- Mapping of Item fields – Choose how you want item/product fields from QuickBooks Online mapping to item fields in SalesIn. The dropdown list shows the available QuickBooks Online fields to map against.
Actions
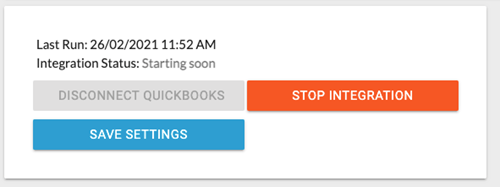
- Authorise with QuickBooks Online – Use this button to authorise the link between SalesIn and QuickBooks Online.
- Stop / Start Integration – When the integration has stopped (likely due to a data related problem that needs attention), you will receive an email and the integration will need to be started again once the problem has been resolved.
How are the different Sales Types mapped?
| SalesIn Status | QuickBooks Online Imported Status |
| Quote | Estimate |
| Order | Estimate |
| Customer Order (B2B) | Estimate |
| Invoice | Invoice |
| Credit Note | Credit Memo |
| Sales Receipt | Sales Receipt |
To run through more information on the system follow this link here – otherwise if you need help with your Quickbooks Online system don’t hesitate to reach out to one of our friendly support staff today.